


After seeing and hearing about Flexible Seating via Facebook and Instagram, I decided it was something I may want to implement and decided to further research it. Considering I was going to be starting the school year at a new school this year I knew I had to speak with my principal about the idea first before I made any decisions. I must admit that I was a little nervous about what my principal would think about the idea because this idea is a little out of the norm. However, when I approached her with the idea, to my surprise she was all for it! Getting her approval made me super excited because I knew that with her support I was on my way to beginning my journey with flexible seating! Here are the 4 steps I took to prepare myself and my classroom for flexible seating.
Step 1: Decide on Seating Options
After reading blog post after blog post I thought about all of the different seating options I have seen and which ones would provide my students with an option that would fit best for all of my different learners. Each year there are students who are extremely active and need constant movement, there are students who like to stand, and others who like to work on the floor. With this knowledge I decided that in my classroom I wanted to have a standing table, floor pillows, scoop rockers, and wobble stools. (I really wanted to add yoga balls too but didn't want to dish out the extra 100 dollars without knowing if this whole flexible seating thing would work in my classroom.)
Step 2: SHOP
(This was my favorite step, considering I am a bit of a shopaholic when it comes to my classroom)
Stools for Standing Table

I was lucky enough to be visiting my parents in Orlando this past summer where they have an IKEA 10 minutes away, That was pretty exciting considering living in Knoxville the closest IKEA is in Atlanta which is a solid 3/4 hour drive depending on traffic. At IKEA I was able to grab these stools for ONLY $5 each. I have also heard that both 5 Below and Dollar General have similar stools. However, I was unable to find them at any of the stores near me.
Scoop Rockers

After seeing these all over Instagram this summer I was on the hunt for them. I must admit that it took me going to about 5 different Walmarts to actually find them. The awesome part about them is that they were ONLY $4.88 each. I only picked up 4 at the time and am kicking myself just a little considering they no longer carry them in stores. However, you can order them online but they are a little bit more expensive than they were in stores.
Floor Pillows
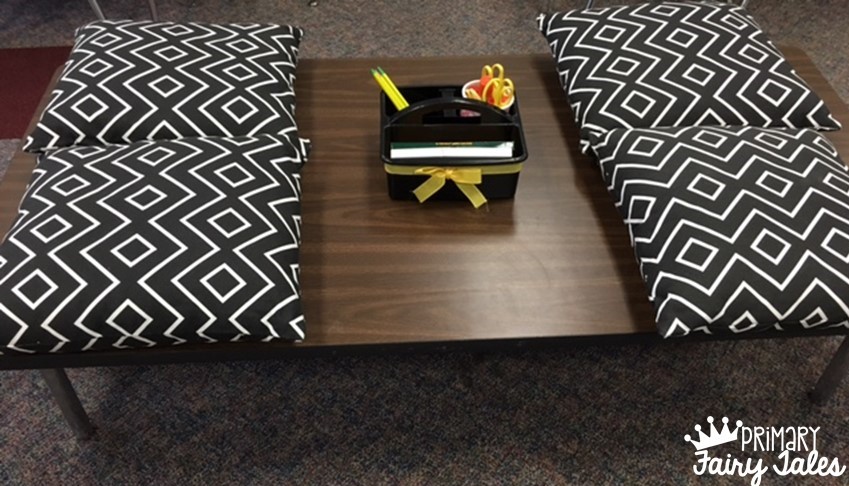
I was able to snag my floor pillows this summer at Hobby Lobby on clearance for $8.00 each. I also had a coupon for a percentage off so that was an added bonus. If you are looking for floor pillows be sure to check out 5 Below, and the clearance section of Hobby Lobby, Target and Walmart for great deals. I also snagged super cute round lemon floor pillows for $3.00 at 5 Below.
KORE Wobble Stools

Now I will admit that these stool as well as the Hokki Stools are a bit pricey, they were $80 each.
In order for me to get these into my classroom I created a GoFundMe project. These stools were the perfect additon for my very busy students who need to constantly wiggle while they work. If you are looking to add flexible seating options into your classroom that are a bit out of your budget GoFund Me or DonorsChoose are a great way to get others to help you get them into your classroom.
Floor Mats & Clipboards

These adorable frog mats were actually given to me by a teacher friend. I love having these in my classroom because my students who like to work on the floor are able to pick them up and bring them anywhere in the room to create their own workspace.

I also used a big metal ice bucket from Target to store our clipboards. This storage solution allows my students who are working on the floor to grab a clipboard to complete their work on.
Desks

Unfortunately I was not able to do away with my desks because at my school there isn't anywhere to store unused furniture. So this meant that I had to find ways to utilize my desks. After turning desks into station tables and independent work areas I used the remainder of the desks to created two groups of desks. On the first day of school these were the students go to seating option but I really think that was because my students were familiar with traditional desks. Now about 3 weeks into school I do find that the desks seem to be a less popular option among my students, but they are there just incase.
Step 3: Decide on Organization
Now that students no longer have a desk to store their supplies in it was important for me to figure out how my students would manage their notebooks and folders. In order to manage their books, folders, and notebooks I assigned each student a drawer using my sterilite 3 drawer towers. These towers allow each student to have their own space to keep their necessary supplies. Originally I had all of these drawers stacked in one area of my classroom, however, I realized that when it came to retrieving our supplies it caused a bit of a traffic jam. Because of this I decided to then scatter the 3 drawer containers about my room. This has had made a world of a difference in the amount of time it takes my students to retrieve and put back their supplies.

Ever since I began teaching 5 years ago I have always used community supplies so I knew that it would make perfect sense to continue using community supplies. Our community supplies consist of crayons, scissors, glue, pencils, as well as erasers. These supplies are kept at each table in a table caddy (purchased from Target Dollar Spot) for easy access. In order to help my students stay organized I placed picture tags on the caddys to clearly label where each supply is suppose to go.

Inside each caddy there are cups holding scissors/glue and another holding pencils/erasers. These cups are recycled icing containers that I covered with patterened duct tape. Each table or group of desks has their own caddy with enough supplies for all those working there. For my work areas without a table or desk the students are able to grab a pencil box to bring to their workspace.

These pencil boxes hold the same supplies found in the table caddys and are kept on a little shelf that I have near our classroom door.
Step 4: Create a Plan
After purchasing my seating options and setting up my room I knew it was time to come up with a game plan. How was I going to introduce this to my students? Where was I going to have them go when they entered on the first day? I knew I had to have a plan for it all. So I started creating a list of ideas in my notebook and decided that I wanted to jump in and start flexible seating on our first day of school. With that I decided that throughout the first week of school I would assign each student a different seating option. I wanted to ensure that during the first week each student had an opportunity to try all seating options and find which ones worked best for them.
After deciding on how the first week would go I knew it was time to think about what my procedures and expectations were. I knew that if I was unclear on my expectations and procedures my students would be too and it would just be chaos. Which is why it was back to my notebook to brainstorm and create another list. I thought very carefully about what my overall rules for flexible seating would be. Then I began thinking about each seating option. What would it look like for them to successfully use that seating option while working? After mapping those expectations out and finalizing them I created my seating expectation posters. These posters were added to a bulletin board so that we could review them as needed and have them as a constant visual reminder. You can grab these editable flexible seating expectation posters in my TPT store here.

I hope you found these steps and ideas helpful as you possibly begin your journey with flexible seating. Stay tuned for an update on what the first week of flexible seating looked like in our
First Grade classroom.
First Grade classroom.

I love all of the seating options you've provided for your kiddos! I haven't yet taken the plunge into flexible seating but this makes it a little less scary to get started. Thanks for all of the great info!
ReplyDeleteAndrea
Looks great! I also started flexible seating this year. I've always done tables (not desks) and kids could basically work anywhere they wanted, but they still had a "home" seat. This year, I have tables with chairs and stools (same awesome Ikea 5$ stools...we JUST got an Ikea in Vegas this year, so we've been there A LOT!), I have a "kneeling" table (took the lower half of the legs off one of my regular tables) with several Ikea pillows, a standing table, four camp chairs, two regular desks with chairs, and the floor, of course...I have carpet and a few fluffy rugs sprinkled around. I'll be introducing clipboards this coming week. I got rid of two big rectangle tables and brought in a smaller one for the standing table. My room feels SO much larger now. I'll be posting pics and doing a blog post on it soon, but I feel it was the easiest and greatest transition and I'm so glad I did it!
ReplyDeleteGreat post and pictures! I'll be checking back when/if I want to add a few more seating choices. Thanks!
Jennifer
Practical Primary Teacher
Great post! I have so many of those options too! I love the rockers (mine are pink too!) and the wiggle stools (mine are black too!). I'll be curious to know how you think it goes. I started it last year about spring break and am doing a hybrid version this year.
ReplyDeletePaige
Our Elementary Lives
This site contains many tales of the grimm brothers: http://princess-castles.blogspot.com.br/
ReplyDelete